
Net10 Mail Admin Guide
For Domain Administrators
Domain Admin Access
Domain Administrator’s access is located at https://mailadmin.net10.net/admin
Personal Mailbox Access
Individual users can access Mail Administration at https://mailadmin.net10.net/
Log In
- Navigate to Net10 Mail Admin (for domain administrators): https://mailadmin.net10.net/admin/
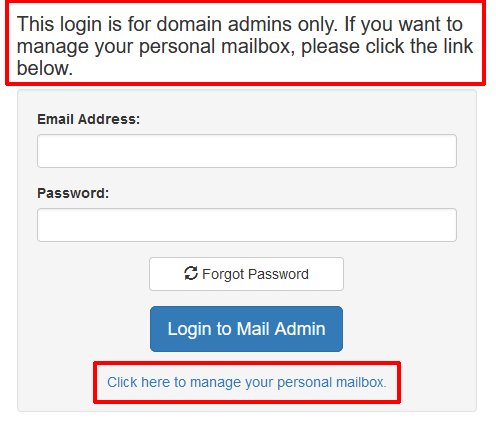
Note the message at the top of the login screen — this is the interface for Domain Admins only. Individual users can manage their Personal Mailbox by clicking on the “Click here to manage your personal mailbox” link. - Once you log in, the main menu will appear.
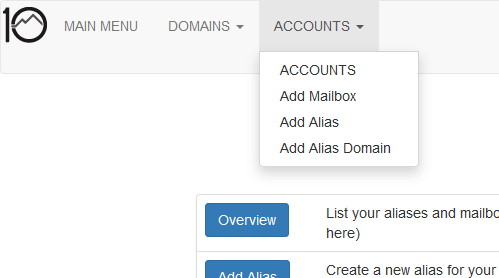
- The menu bar across the top of the screen provides access to the major functions of Mail Admin. DOMAINS will provide a list of the domain(s) that your administrator account has access to. ACCOUNTS will expand a sub-menu: Accounts will list all mailboxes and aliases visible to you. Add Mailbox will allow you to create a new mailbox. Add Alias will allow you to add an alias (i.e. an email address that forwards to another). Add Alias Domain will allow you to forward an entire domain to another domain.
Add Mailbox
- To add a mailbox, select the Add Mailbox option from the Accounts menu.
- In the Username field, enter the desired username. This becomes the first part of the email address, before the @ sign.
- The dropdown box under the Username field will allow you to select the domain name (the portion of the email address after the @ sign). If you have multiple domains you will need to make a selection here. (Note: If you manage many domains, it may be easier to add mailboxes by selecting the DOMAINS menu, clicking on the desired domain, and then clicking the Add Mailbox button.)
- Enter the desired password in both the Password and Password (again) boxes. The system will enforce password complexity requirements and notify you if they are not met.
- In the Name box, enter the full name of the user. This is for your reference in the user list.
- In the Quota box, you will have the option to limit the size of the mailbox. The max shown underneath the field is the maximum allowable value for your account. (If you need support for larger mailboxes, please contact Net10 Support)
- The Active box should be left checked.
- The Send Welcome mail checkbox will trigger the sending of a short welcome/test message to be sent to the user.
- Other e-mail can be filled in with an alternate email address for the user, to be used for recovering account access if the password is forgotten.
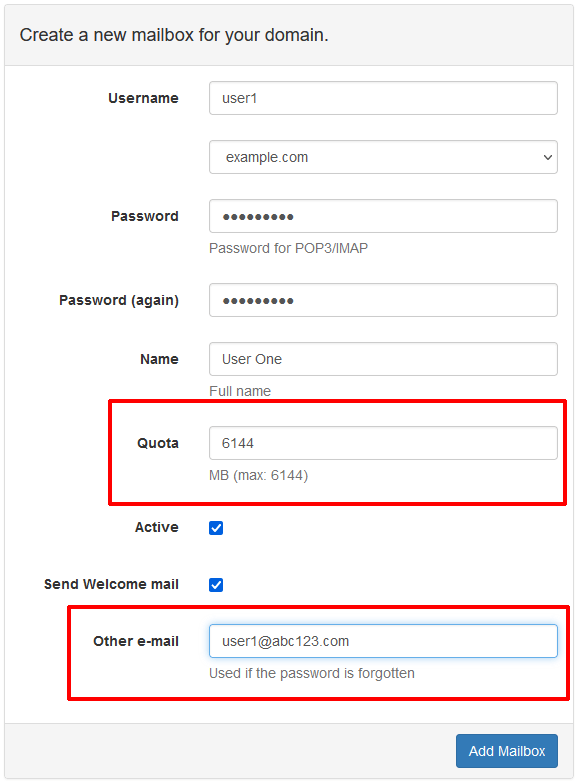
- When all the fields are completed, click the Add Mailbox button.
Add Alias
- To add a mailbox, select the Add Alias option from the Accounts menu.
- In the Alias field, enter the desired alias. This becomes the first part of the email address, before the @ sign.
The dropdown box under the Alias field will allow you to select the domain name (the portion of the email address after the @ sign). If you have multiple domains you will need to make a selection here. (Note: If you manage many domains, it may be easier to add aliases by selecting the DOMAINS menu, clicking on the desired domain, and then clicking the Add Alias button.) - In the To box, enter the target address(es) for the alias. This is where the mail will actually be delivered. You may enter multiple addresses here – one per line. Just press Enter/Return between each entry to place the next entry on a new line.
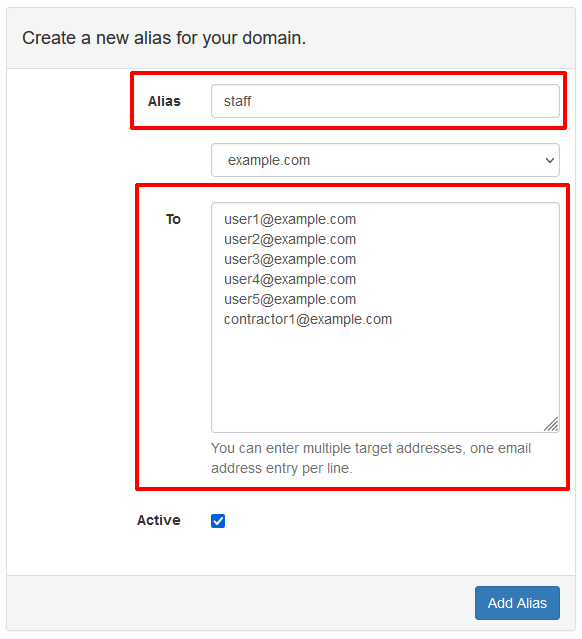
- Note: You can also use the Alias function for small mailing lists, such as for groups of employees.
- The Active box should remain checked.
- When finished, click the Add Alias button.
Add Alias Domain
- An alias domain will forward all mail from one of your domains to another of your domains. Please note that this function requires that both the “source” and “destination” domains be hosted with Net10.
- Click on the Add Alias Domain option under the ACCOUNTS menu.
- In the Alias Domain dropdown, select the source domain.
- In the Target Domain dropdown, select the target domain. The target domain is where the email messages will be delivered.
- The Active box should remain checked.
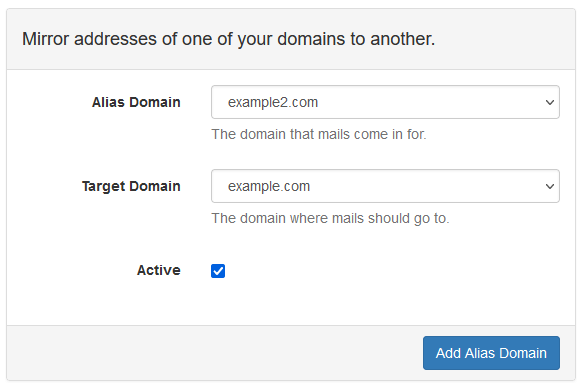
- When finished, click the Add Alias Domain button.
Delete Mailbox or Alias
- To delete a mailbox, click on the DOMAINS menu. In the list domains, click the name of the domain containing the mailbox you want to delete.
- In the :: Mailboxes section, find the mailbox you wish to delete. Click the Delete link next to the mailbox.
- To delete an alias, find the alias in the :: Aliases section and click the Delete link next to the alias.
Perform User Admin Functions
- The Domain Admin interface can also be used to perform the basic functions that an individual user can perform using the Personal Mailbox access. These functions include forwarding, auto-responder (Out-of-Office), and password changes.
- To access these functions, click on the DOMAINS menu and then click the name of the domain containing the mailbox you want to update.
- In the :: Mailboxes section of the resulting screen, you will have access to several options next to each mailbox: Responder (allows you to edit the auto-responder message for the mailbox), Alias (allows you to set forwarding for the mailbox), Edit (allows you to change the password), and Delete (allows you to delete the mailbox).