
Thunderbird Setup Instructions
Incoming Server Settings
Account Type: IMAP
Incoming Server: m.net10.net
SSL: Enabled
Incoming Port: 993
Username: Your full email address
Outgoing Server Settings
Outgoing Server: m.net10.net
SSL: Enabled
Outgoing Port: 465
Username: Your full email address
Note: Before proceeding, always make sure your version of Thunderbird is up to date. You can download the latest version from the Thunderbird Website, or go to your existing installation and click on the 3 lines icon at the top right corner, then click Help, then click About Thunderbird and verify that the test Thunderbird is up to date appears.
Thunderbird Initial Setup
These instructions are for adding your account to Thunderbird. For updating settings on your existing account, please scroll to the Update Existing Settings section.
- Launch Thunderbird.
- Click the 3 lines icon at the top right corner of the window and then select Account Settings.

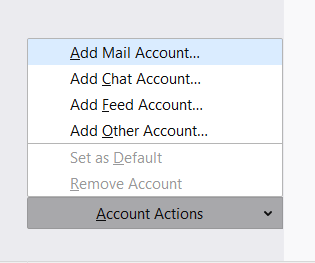
- In the lower left corner of the window, click on Account Actions and then select Add Mail Account.
- In the Your name box, enter your name as you would like it to appear in your outgoing email messages.
Enter your email address in the Email address box.
Enter your password in the Password box.
Click on the Configure manually button at the lower left corner.Under the INCOMING column, make the following selections/entries:
Protocol: IMAP
Server: m.net10.net
Port: 993
SSL: SSL/TLS
Authentication: Normal password
Username: Your full email addressUnder the OUTGOING column, make the following selections/entries:
Server: m.net10.net
Port: 465
SSL: SSL/TLS
Authentication: Normal password
Username: Your full email address
- Click Done.
- Close the Account Settings window by clicking the X on the Account Settings tab at the top of the screen.

- You can now access your Net10 email account and folders in the left column under your email address.
Update Existing Settings
This section is for updating settings for your existing account in Thunderbird. If you are setting up your account in Thunderbird for the first time, you do not need to follow these steps – scroll back up to the top of the document.
- Launch Thunderbird.
- Click on the 3 lines icon at the top right corner of the screen and then select Account Settings.
- Locate your Net10 email account in the left column and click on Server Settings under that account.
Make note of the Server Type that is indicated.
Set Server Name to m.net10.net
If Server Type is IMAP, enter 993 for the Port.
If Server Type is POP, enter 995 for the Port.
Set Connection security to SSL/TLS.
Set Authentication method to Normal password.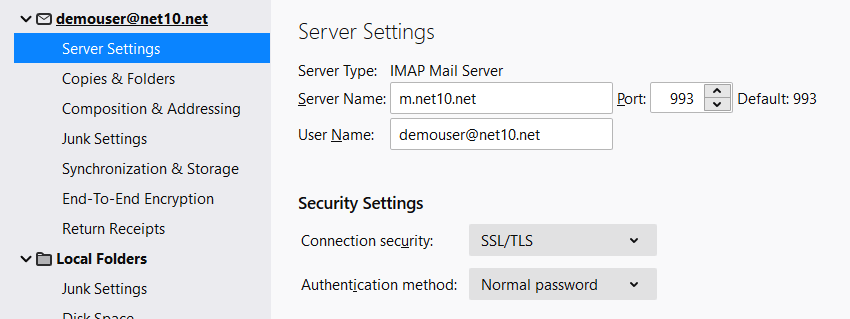
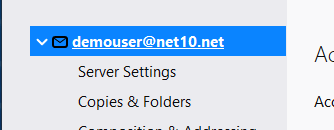
- Back in the left column, click on the heading for your Net10 email account. (This is the item one line above Server Settings.)
- Near the bottom right corner, click on Edit SMTP server…
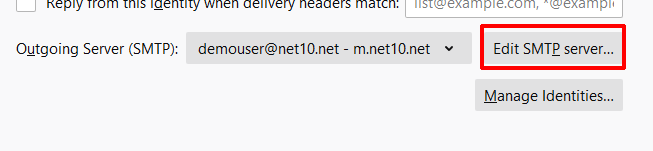
- Set Server Name to m.net10.net
Set Port to 465
Set Connection security to SSL/TLS
Set Authentication method to Normal password
Set User Name to your full email address.
Click OK.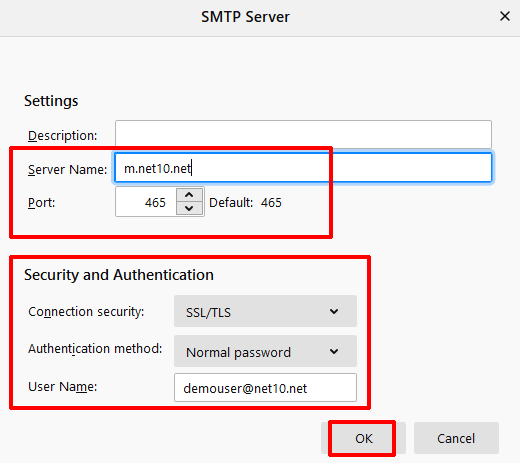
- Click the X on the Account Settings tab at the top of the window.
- Your settings have now been updated.